Spellbloggers post - Bee 'A little dose of happy' Tutorial
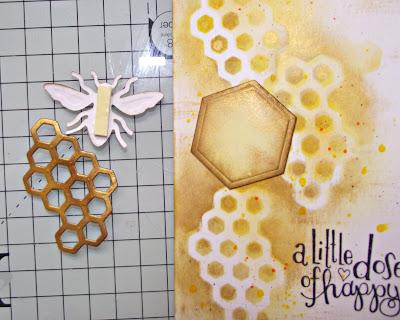
I recently chose the Honey Bee die collection as part of Spellbloggers package as I felt all the shapes are just so very versatile and do not have to be related ... however for my first post using the dies, I have gone with a bee themed project with an accompanying mini tutorial. Here's the card I am going to share with you ...

So grab a beverage - my preference is a large black coffee - and let's begin ...
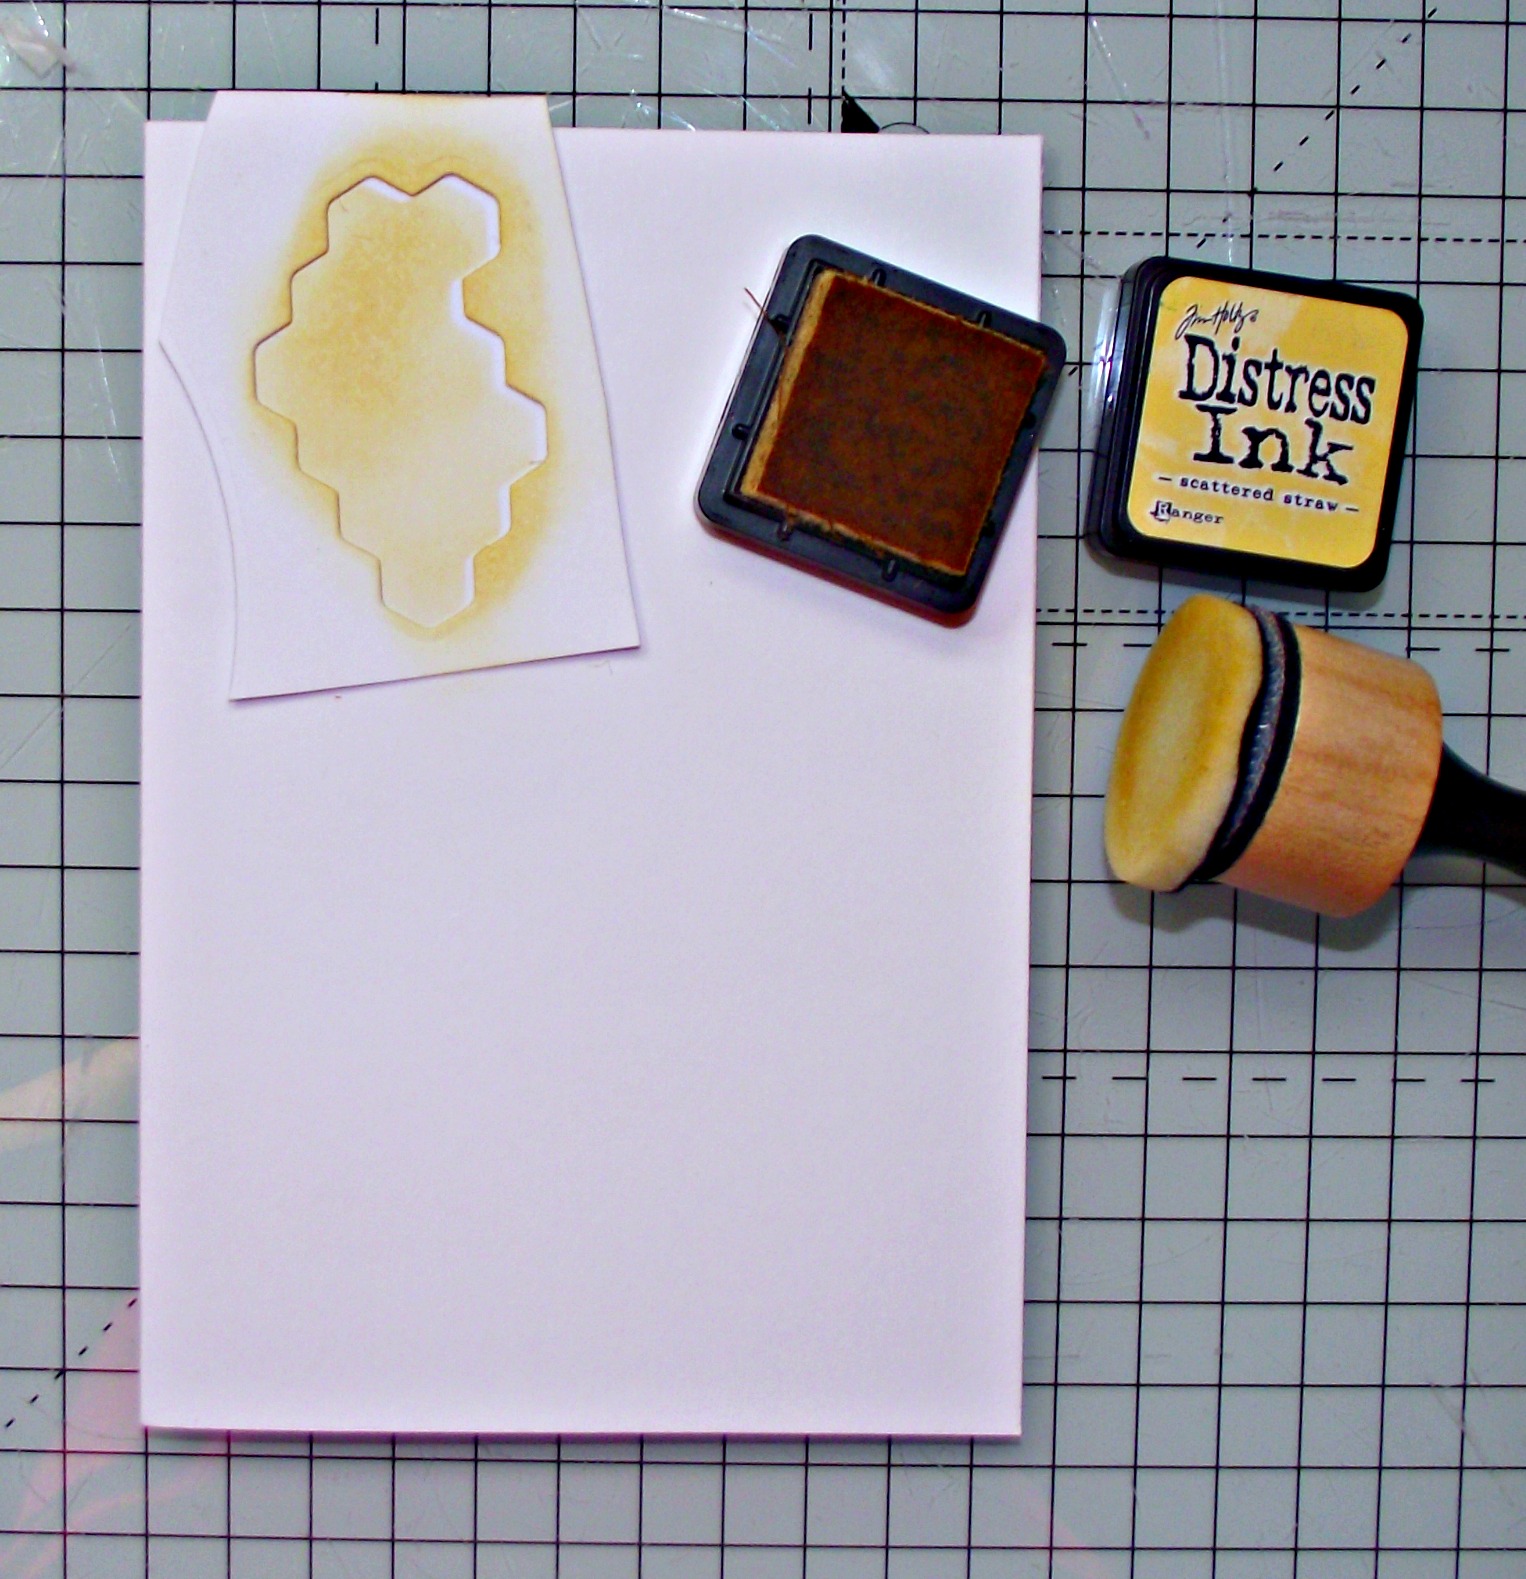
I started by cutting out the honeycomb die and using the 'waste' to create a simple background using scattered straw distress ink.

Next using the honeycomb die cut, I went over my background but this time with mustard seed distress ink. Repeat on each section.

To add a little shadow, I used the same die cut but this time with walnut stain distress ink. My die cut is now becoming more aged , which was my plan all along ... honestly ...

This part could be an optional extra but I wanted to add some 'shine' to my background, so have again gone over the background, (using honeycomb die cut) but with Indian Gold Nuvo embellishment mousse, (from Tonic Studios). I hope you can see the golden detail in my photo below.

To soften all my edges, I used an old paint brush and dry brushed more of the embellishment mousse which has given me more 'shine' but at the same time added a softer feel to the background.

Again another 'optional extra' but I decided to flick some corresponding ink colours over my background, (using Nuvo Aqua Flow pens) and dabbed off the excess with a wet wipe. That's the background finished ... no more 'adding' ...

Before adding my other die cut embellishments, I stamped the sentiment and have used the wonderful Tiny Sentiments stamp set. I adore the script. If you do not want the added designs, mask off your stamp and just ink the sentiment.

From the same die set, I also cut and embossed a hexagon and a bee - from white card - and added the same colours to each as I used on my background. You could easily do this as you did each layer on your background to save time.

I added the hexagon but wanted to make the honeycomb and bee die cuts stand out more, so had a cunning plan. Adding 3D foam to the bees body only, I then stuck my bee to the honeycomb - see below.
Next, I added 3D foam to the reverse of the honeycomb in exactly the same place as I had on the bees body. Gosh I hope that makes sense, if not, fingers crossed, the photo below will help explain a little more ...

Finally add your layered bee and honeycomb to the hexagon and 'voila', your card is finished. As a final touch, I have added some of the small hexagon waste (from honeycomb die cut) on to my card.

I thoroughly enjoyed making this card and apologies if my photographic skills do not clearly demonstrate how shimmery the card looks 'in real life'. In fact I was sooooooooo impressed with how the colours blended brilliantly, I used the same colour scheme to make another card ... so watch this space.

If you get the chance, pop over to the Spellbinders gallery to get oodles and oodles more inspiration from the Spellbloggers team.
Have a great day ... I'm decorating so getting messy in a completely different way 😁
Lou
x x x
Products & links:

I would like to share my card in the following challenges:
2 sisters on the blog - anything goes
A perfect time to craft - anything goes
CAS mixup - anything goes
Die Cut Divas - anything goes
Dies R Us - summertime fun
Crafting from the heart - anything goes
Simon Says Stamp - Happy Birthday
Stamps & Fun - anything goes
#spellbinders #spellbloggers #neverstopmaking

So grab a beverage - my preference is a large black coffee - and let's begin ...
I started by cutting out the honeycomb die and using the 'waste' to create a simple background using scattered straw distress ink.
Next using the honeycomb die cut, I went over my background but this time with mustard seed distress ink. Repeat on each section.

To add a little shadow, I used the same die cut but this time with walnut stain distress ink. My die cut is now becoming more aged , which was my plan all along ... honestly ...

This part could be an optional extra but I wanted to add some 'shine' to my background, so have again gone over the background, (using honeycomb die cut) but with Indian Gold Nuvo embellishment mousse, (from Tonic Studios). I hope you can see the golden detail in my photo below.

To soften all my edges, I used an old paint brush and dry brushed more of the embellishment mousse which has given me more 'shine' but at the same time added a softer feel to the background.

Again another 'optional extra' but I decided to flick some corresponding ink colours over my background, (using Nuvo Aqua Flow pens) and dabbed off the excess with a wet wipe. That's the background finished ... no more 'adding' ...

Before adding my other die cut embellishments, I stamped the sentiment and have used the wonderful Tiny Sentiments stamp set. I adore the script. If you do not want the added designs, mask off your stamp and just ink the sentiment.

From the same die set, I also cut and embossed a hexagon and a bee - from white card - and added the same colours to each as I used on my background. You could easily do this as you did each layer on your background to save time.

I added the hexagon but wanted to make the honeycomb and bee die cuts stand out more, so had a cunning plan. Adding 3D foam to the bees body only, I then stuck my bee to the honeycomb - see below.

Next, I added 3D foam to the reverse of the honeycomb in exactly the same place as I had on the bees body. Gosh I hope that makes sense, if not, fingers crossed, the photo below will help explain a little more ...

Finally add your layered bee and honeycomb to the hexagon and 'voila', your card is finished. As a final touch, I have added some of the small hexagon waste (from honeycomb die cut) on to my card.

I thoroughly enjoyed making this card and apologies if my photographic skills do not clearly demonstrate how shimmery the card looks 'in real life'. In fact I was sooooooooo impressed with how the colours blended brilliantly, I used the same colour scheme to make another card ... so watch this space.

If you get the chance, pop over to the Spellbinders gallery to get oodles and oodles more inspiration from the Spellbloggers team.
Have a great day ... I'm decorating so getting messy in a completely different way 😁
Lou
x x x
Products & links:
 |  |  |  |  |
 |  |
I would like to share my card in the following challenges:
2 sisters on the blog - anything goes
A perfect time to craft - anything goes
CAS mixup - anything goes
Die Cut Divas - anything goes
Dies R Us - summertime fun
Crafting from the heart - anything goes
Simon Says Stamp - Happy Birthday
Stamps & Fun - anything goes
#spellbinders #spellbloggers #neverstopmaking
Comments
Darlene (DRU Blog Leader)
DIES R US CHALLENGE BLOG
DAR’S CRAFTY CREATIONS Please come for a visit.
Nicolette DT 2Sistersontheblog.
Thank you for sharing with us over here at "A Perfect Time To Craft" and best of luck with your entry.
Annette DT for http://aperfecttimetocraft.blogspot.com.au/...
Victoria DT for http://aperfecttimetocraft.blogspot.com.au/...
Caroline DT 2Sistersontheblog
Bye, Ine
http://creaine-cards.blogspot.nl/
DT for: http://aperfecttimetocraft.blogspot.nl/