"Owl be alright" for a Winter birthday ...
Candy Alert *** Candy Alert *** Candy Alert ***
Have you entered my birthday blog candy yet?
If not pop over to this post HERE to get all the details.
The new theme this fortnight over at polka Doodles Challenges is "Winter birthdays" and as a person who does indeed celebrate during this season, I wanted to do something a little different, so I've made a winter themed/looking gift using a template from Twiggy and Toots Festive fun collection. Now ..... the template is originally for a bag but with a little tweaking, I turned it in to a desk tidy with a drawer ...
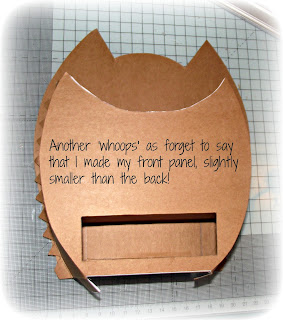
Print off the whole template from the Twiggy and Toots collection on to cheap paper in draft print, (well why waste ink) and begin cutting out your back and front parts from card. I have straightened out the sides a little to make my owl sturdier when standing.
Now this is where some measuring comes in to play ... I wanted my sides to be bigger than the template, so after deciding on their width, measured the template sides and then I could work out how much bigger I would need to make the template. In the end I only need to make the sides 1cm bigger. So to keep all the gluing tabs, this is what I did ...
First, I cut our the side template and cut it in half, sticking one piece to the outside edge of my card. Next I measured the 1cm extra I needed and drew a line. Using this line, I glued the other side template in to place and this now gives me the width I needed. Repeat the above for the other side and remember to add the tab at the top ...
Back and front cut out ... tick, sides done and cut out ... tick, now planning the drawer part. For the bag, you do not get a drawer but every desk tidy needs a drawer doesn't it? Taking the front panel, decided where you want your drawer to be, measure and then cut the aperture away.
As I know the width of my sides, I know what gap. I now need to make my supporting platforms. I just measure the length of where they need to be and add 1cm to each side. I do this for the inner support and the bottom support.
Glue your sides to the front panel, placing the tabs on the inside and your tab is at the bottom. Also glue your supports for drawer (sorry no photo) ...
I chose to place the tabs on the outside when gluing the front to the back piece and that was really for ease when sticking.
Now the messy fun part .... yippee! I printed off 3 different papers on to cheap copy paper in draft print. I want a washed out look, so draft print gives me this straight away. I then tear up the papers in to varying sizes and using a medium, begin sticking them randomly to my owl.
Now I really did have creative fun and decorated to my hearts content ... adding die cut scalloped borders, texture paste, paint, embellies galore and finally the drawer! Oh what fun and what I needed to shake the illness blues. Here are some photos of the finished piece ...
A close up of the front with those "eyes" ...
The inside; although I was lazy and didn't paint etc all the way down ...
One of the sides ...
and finally, "Twiggy" in all his glory showing the opening drawer ...
Just what I needed to help shake the illness blues and try and get myself to concentrate, (which I am struggling with). This took over a week to make as I kept running out of energy but loved being able to pop back to him and add or tweak things.
Right better add it to the Polka Doodles challenge blog now, as I am mighty late!
Lou
x x x
Products and links:
Challenges:
C.R.A.F.T - not a card
Craft Rocket - happy anything
Crafting with an attitude - anything goes
Inspiration Destination - anything goes
Crafting from the heart - anything goes
Altered Eclectics - anything goes
Rhedd's Creative Spirit - anything goes


Comments
Hugs
Linda xxx
Mia - Polkadoodles DT
Jenny xx